My daughter is a teacher, and wanted to make a gift for her seniors. She saw a project on Pinterest, and showed me a picture, and I made a pattern for her (us) to put together.
How fun, right??? My daughter filled the jars with affirmations and will add a letter- plus candy : )
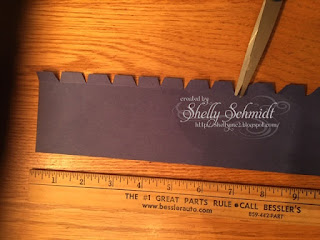
She had constriction paper to use, and school colors blue and white. I cut a strip 12" by 2 3/4" I scored each sheet at 3/8"
This piece is going to go around the jar, so measure your jar and add a 1/4"-3/8" Folded area. We cut little triangles in that extra border since the piece will go around in a circle to meet the cap (top).
This is what this piece looks like when fit around the jar. I slipped it off the jar and marked where the adhesive should go. I added a strip of 1/4" double sided tape to the end of the strip and adhered it.
I am using daughters construction paper, so punched our 3 circles using a 1" circle punch. For the cap, the square will depend on the size of your jar-= these are 4" x 4".
The circles are glued together, then a small hole punched in the center. A brad is inserted into the hole. On the Lt, you are looking at the circles from the top.
Next, you will look the tassle cording around the brad and open it up and flatten the brad over the cord. Then, I applied a 3/8" adhesive circle dot over the center of the brad.
Next, the circle brad is applied to the center of the Grad cap top. For this later, it was too flimsy using the construction paper, so I did glue a layer to it of 4" x 4" SU blue cardstock on the bottom.
My daughter bought the tassles on Amazon about a month ago. She added candy and affirmations, and each will have a personal letter she writes.
I hope you enjoyed this project. We had three of us putting these together- I had everything pre-cut and punched already, and it took us about 2 hours not including adding the candy and affirmations.
I will add 2020 or something to the top of the hats before she delivers all of them.
Thanks for stopping by!
Shelly


