I had fun creating today with some Globecraft Piccolo products, and made a Keepsake Ornament.
This bubble domed oval was a dickens to photograph! This is my parents this past year celebrating their 59th wedding Anniversary. The picture is wallet sized and the frame is called the
Mini Bubble Frame Kit.
I laid this on an angle and got out of any light source and you can really see the sparkle here.
I had never heard of the Globecraft Piccolo line before SweetStamps purchased the company. The Enamel EP is to die for- it has a beautiful shimmer to it.
Tutorial on how this ornament was created.
The kit has 3 pieces. I printed a picture of my parents and cut it down just a tiny bit smaller than the oval 'rim' frame. I measured where the center is, and punched 2 small holes for the cording under where the small rimmed frame will sit.
Pick your colors. Add the Enamel EP Adhesive to the chipboard. Add the embossing powder. I do this step in coffee filters (from the dollar store). If you have a heat gun that blows air and heat, start from the underside so all of the sparkle and EP does not get blown away. (I have one that just blows heat and one that blows both heat and air). I used 2 layers of EP on the rim, as there were a few areas I wanted more coverage on.
***Tip- if you add another layer of EP, make sure you let the 1st layer cool down, otherwise the tip of the adhesive will get EP on it.....don't ask me how I know this : ) ****
While I am embossing, I cut a spare piece of chipboard I saved from used Piccolo elements, and make a sample for the top of my jar- I am very visual........
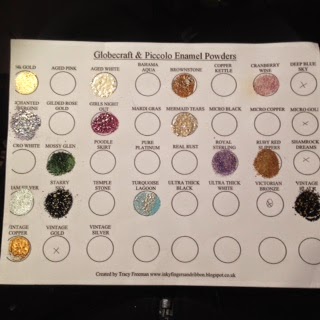
I also add new colors to a GP chart I found on the website- you can find the link
HERE- Thanks for sharing this Tracy!
I just want to add sparkle around the rim of the back piece, as the picture will cover up most of the back oval. I lightly draw a line with a pencil. Apply adhesive and don't forget the edges.
Just the edge of the front is embossed.
The entire back is embossed- this Gold EP is spectacular in person
Next, I glued the bubble to the oval rim with Crystal effects. If you run a used dryer sheet over the inside of the bubble, less glitter from the EP will adhere to it.
While that is drying, I made and added the bow with a glue dot. I used ~ 14" of the gold thread for the bow and back hanger. You could make thread longer if you wanted it to be the hanger for the tree- or where ever you are going to hang it. Make the bow starting with the center of the thread. Put the tails through the two holes you punched.
Next, glue down the oval rim & bubble to the backing - I also used Crystal effects for this step.
Hmmm, it needs a little something more, so I added stars from the A144 Flowers, Stars,
Hearts and Flourishes.
These are the products I used from the SweetStamps.com Store:
Enamel EP Adhesive
HERE
24K Gold Enamel EP
HERE
Aged White Enamel EP
HERE
Piccolo Elements Flowers, Stars, Hearts and Flourishes
HERE
Mini Bubble Frame Kit
HERE and you can find a picture for this in the Globecraft Piccolo store
HERE
Challenges:
QKR Stampede- Anything but a card
CRAFT- Christmas presents (this one of for my parents)
Crafty Creations- Embossing
Frilly and Funkie- A gift from the Heart
Thanks for stopping by today!
Shelly