I had a blast this weekend at a Family Party and wedding reception. My Nephew Patrick was married in August in New York, and the Illinois reception was yesterday. I was able to participate by helping with the table centerpieces.
This is one of the Center pieces we made- this one has gold sprayed webbing on it.
This box uses creative Inspirations Gold paint dabbed on- then was sprayed with Glimmer Mist.
Another box with webbing. The bride and Groom selected pictures of themselves and their families throughout the years, and it was fun to go from table to table to see all of the fun pictures.
Here is what we did to make these:
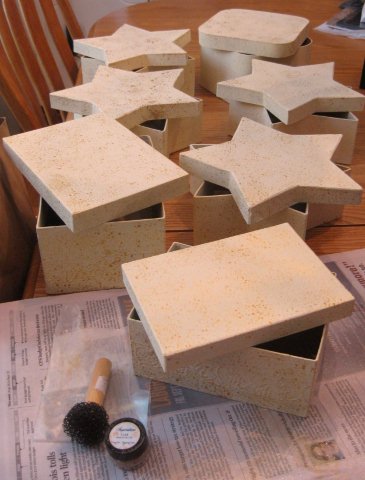
First, we painted all of the boxes with an off white/cream colored acrylic paint. (2 coats actually).
We sprayed Gold webbing on 1/2 of the boxes, and dabbed on Gold Creative Inspirations Paint on the other 1/2. You can see the 'dabber' I used to apply the paint. Once dry, we sparyed on Glimmer Mist.
Here is a closer look at the paint dabbed on the box.
You can see in this picture, we also painted ~ 1 1/2-2 inches of the inside of the box. We took a piece of styrofoam about an inch less than the height of the box , about an inch wide and approximately 3 inches long and hot glued it into the boxes.
For the inside, we used plastic garbage bags or tissue paper and set it inside of the box. We put a piece of tissue paper over the skewer and tucked it into the sides. Oh- the center stick is a wooden skewer covered with glitter.
We used removable 'Zots' to attach the pictures back to back- many of the boxes had a 'his' on one side and a 'hers' on the other side. It was so sweet to see the pics of Pat and his Dad and Kristi and her dad, next Pat and his siblings and Kristi and her siblings (he is from all boys, and she is from all girls)...... I also liked their first dance (at my brother Shawn's wedding) and their first dance married at their wedding.
Challenges:
Creative Stamp Friends-Anything goes- and Anything but a card
Make it Monday- anything goes
Shabby Tea Room- Vintage White
Lollipop Crafts- Anything but a card
Quirky Crafts- Anything but a card
Allsorts- Alter or recycle something
Stamp with Dragon- 3-D
Thanks for stopping by!
Shelly
Monday, September 19, 2011
Friday, September 16, 2011
McMahon Five Designs SVG fun and a Splitcoast Challenge for you!
First of it's kind at M5D!
ONE set, ONE purchase, FOUR file formats!

you will receive each image in following file formats:
svg, pdf, png, and eds.


We DO!
fun new things going on
WELL...
Are You Ready?
Have fun and enjoy your weekend!
Shelly
Thursday, September 15, 2011
New Release at McMahon Five Designs 9/15/11
Another fun release at McMahon Five Designs- I choose to work with the fun Halloween Parade image. I love the style of Michelle Zindorf and used it on this card.
I brayered on So Saffron, More Mustard and Pumpkin. I brayered Blue in the center of the card. I sponged some dark color on the bottom of the card in black, and smudged it on the top, so I ended up sponging on black in on the top as well. I added White Gel pen to the tops of the image. The image is a digital image called Halloween Parade (It also comes in a PNG). The sentiment is from Create with TLC.
Thanks for stopping by! Shelly
I brayered on So Saffron, More Mustard and Pumpkin. I brayered Blue in the center of the card. I sponged some dark color on the bottom of the card in black, and smudged it on the top, so I ended up sponging on black in on the top as well. I added White Gel pen to the tops of the image. The image is a digital image called Halloween Parade (It also comes in a PNG). The sentiment is from Create with TLC.
Thanks for stopping by! Shelly
Labels:
Create with TLC,
McMahon Five Designs
McMahon Five Designs New Releases 9/15/11
Another fun week of releases at McMahon Five Designs:

Close Up by: Shawne
Thanks for stopping by! Shelly

Card by: Shawne
Card by: Sue
Card by: Christine
Card by: Maxine
Card by: Michelle B
Card by: Shelly
Close up by: Shelly
Decor by: Michelle A
Close Up by: Maxine
Card by: Sue
For more details on the projects above, visit the Design Team blogs!
Wednesday, September 14, 2011
Creative Belli Challenge #126-String
We are challenged to use 'String' for the Belli Challenge. I used Baker's Twine.
I used three strands of green Baker's Twine and Zig-Zag'ed over them for the flower stem. The thread is a variegated green, so it is lighter and darker in spots. The pre-colored digital image is from McMahon Five Designs. I did add some sparkle with Sakura Gelly pen around the tulip edges and on the swirls of the flowers. If you stopped by for the Vellum challenge last time, you will recognize the swirly vellum in the background of the flowers.
I made a second card using a single flower as well.
I highlighted the background embossing with peach, green and blue color. The DSP is SU.
******************************************************************************
HOW did I make that grass- I wanted to do a picture tutorial for this method. I do not know how you could do this without a sewing machine, but I am sure there is a way!
I used two colors of Bakers twine- a light and a dark green. I measure to see how wide and tall I want my grassy area- no worries if it is too tall- you can always mow some off the top...... if it is too short- that is not so good. Cut out a piece of cardstock in the dimensions you want your grass. I added a little piece of double sided tape to hold the beginning piece of twine- keep it at the top of the grassy area- never sew over tape. Wrap the twine around the cardstock until it is fully covered.
Next, sew a straight stitch across the bottom of the strip. Then Lay the strip on the card where you want it, and sew again over the same line.
Next, cut at the top- I cut a little under the top so the top row is a little shorter than the back row. No worries, again, you can trim the twine if you need to. I put a piece of black thread over the twine so you can see where to cut.
Here is the piece with the twine cut all of the way from side to side.
Now, fold down the first row of twine and the cardstock that is in the center- the sewing perforated the cardstock, so just pull from one side or the other, and it will tear right out. (The piece of cardstock between the stitching and the edge will stay inside the twine).
Fluff up the twine and see if you like the way it looks. If you don't, just trim it with your scissors.
****************************************************************************************
The spirit of the Belli challenges is to encourage you to use your OLD and FORGOTTEN embellishments!
For ideas and inspiration, check out the DT creations:
Ceal Pritchett
Anne Harmon
Jessica Stockmeyer
Joan Ervin
Maria Matter
Joy Hadden
Robin Parker
Mary Marsh
Karen Wallace
Also, if you upload a card to any galleries online to Splitcoast , PCP, Stamp TV or another online gallery be sure to add CBC126 in the keywords section.
Challenges:
Craft your Passion- F word- flowers, (embossed) flourishes
Hybrid Chick Card Caravan- Use twine on your project
Make it Monday- Anything Goes
One Stitch at a Time- Anything Goes
Alphabet Challenge- P is for Pretty Pastels
Card Two:
Paper and Such-Tic -Tac -Toe-flower, designer paper and twine
House of Gilli- embossing
Thanks for stopping by today- you have two weeks to join us!
Shelly
I used three strands of green Baker's Twine and Zig-Zag'ed over them for the flower stem. The thread is a variegated green, so it is lighter and darker in spots. The pre-colored digital image is from McMahon Five Designs. I did add some sparkle with Sakura Gelly pen around the tulip edges and on the swirls of the flowers. If you stopped by for the Vellum challenge last time, you will recognize the swirly vellum in the background of the flowers.
I made a second card using a single flower as well.
I highlighted the background embossing with peach, green and blue color. The DSP is SU.
******************************************************************************
HOW did I make that grass- I wanted to do a picture tutorial for this method. I do not know how you could do this without a sewing machine, but I am sure there is a way!
I used two colors of Bakers twine- a light and a dark green. I measure to see how wide and tall I want my grassy area- no worries if it is too tall- you can always mow some off the top...... if it is too short- that is not so good. Cut out a piece of cardstock in the dimensions you want your grass. I added a little piece of double sided tape to hold the beginning piece of twine- keep it at the top of the grassy area- never sew over tape. Wrap the twine around the cardstock until it is fully covered.
Next, sew a straight stitch across the bottom of the strip. Then Lay the strip on the card where you want it, and sew again over the same line.
Next, cut at the top- I cut a little under the top so the top row is a little shorter than the back row. No worries, again, you can trim the twine if you need to. I put a piece of black thread over the twine so you can see where to cut.
Here is the piece with the twine cut all of the way from side to side.
Now, fold down the first row of twine and the cardstock that is in the center- the sewing perforated the cardstock, so just pull from one side or the other, and it will tear right out. (The piece of cardstock between the stitching and the edge will stay inside the twine).
Fluff up the twine and see if you like the way it looks. If you don't, just trim it with your scissors.
****************************************************************************************
The spirit of the Belli challenges is to encourage you to use your OLD and FORGOTTEN embellishments!
For ideas and inspiration, check out the DT creations:
Ceal Pritchett
Anne Harmon
Jessica Stockmeyer
Joan Ervin
Maria Matter
Joy Hadden
Robin Parker
Mary Marsh
Karen Wallace
Also, if you upload a card to any galleries online to Splitcoast , PCP, Stamp TV or another online gallery be sure to add CBC126 in the keywords section.
Challenges:
Craft your Passion- F word- flowers, (embossed) flourishes
Hybrid Chick Card Caravan- Use twine on your project
Make it Monday- Anything Goes
One Stitch at a Time- Anything Goes
Alphabet Challenge- P is for Pretty Pastels
Card Two:
Paper and Such-Tic -Tac -Toe-flower, designer paper and twine
House of Gilli- embossing
Thanks for stopping by today- you have two weeks to join us!
Shelly
Tuesday, September 13, 2011
Bloggers Challenge-Stars
What's on Trisha's desk post is HERE
For Bloggers Challenge, our challenge is STARS
I made a card with a digital image from OWH from the past. It uses the Shy Bears- I am sorry I do not remember who gave this freebie away. (Here are free digi's currently available at OWH).
The past few days are so full of emotion- I watched a couple of documentaries about 911 and am full of sadness and joy- so many people made it out of the towers alive -but how the event changed us as a nation! It is so awesome to see how people came together as one to help after 911. It is really sad to see the first defenders with health issues now and PTSD.
My card will go to a soldier in Afghanastan, so I cannot add glitter, but I did add a touch of sparkle with a Sakura Gelly Roll pen to all of the stars- on the image and in the DSP. I added a piece of coordinations in red embossed with stars, and then sanded it so the core color showed through.
If you would like to join in with the Bloggers Challenge this week, add your link to Mr Linky below. Stop by challenge Mom- LISA's blog too- we play every Friday, and you can join us anytime in the week.
Have a great day!
Shelly
For Bloggers Challenge, our challenge is STARS
I made a card with a digital image from OWH from the past. It uses the Shy Bears- I am sorry I do not remember who gave this freebie away. (Here are free digi's currently available at OWH).
The past few days are so full of emotion- I watched a couple of documentaries about 911 and am full of sadness and joy- so many people made it out of the towers alive -but how the event changed us as a nation! It is so awesome to see how people came together as one to help after 911. It is really sad to see the first defenders with health issues now and PTSD.
My card will go to a soldier in Afghanastan, so I cannot add glitter, but I did add a touch of sparkle with a Sakura Gelly Roll pen to all of the stars- on the image and in the DSP. I added a piece of coordinations in red embossed with stars, and then sanded it so the core color showed through.
If you would like to join in with the Bloggers Challenge this week, add your link to Mr Linky below. Stop by challenge Mom- LISA's blog too- we play every Friday, and you can join us anytime in the week.
Have a great day!
Shelly
Labels:
bloggers Challenge,
Operation Write Home
Saturday, September 10, 2011
What's on Trisha's Desk?
Trisha issued a challenge on the Gingersnaps Yahoo group to use items received in an envelope from her- from what was on her desk- and to create with it. Trish will post all of the cards submitted on her blog this Tuesday.
I know you are looking at the picture wondering who's blog you are on....yep- it's me.....! I used a collage type layout and have to say I enjoyed it very much! The image, french page/text, ticket, background DSP and the shimmery paper behind Trisha's signature are all from Trisha. I cut her signature out from the letter she sent with the swap items. the butterflies and strip with KC on the bottom are cut off of her envelope.
I like to sew on cards- so added some stitching. I think this is my first 4" x 81/2 " card- I could be wrong...... I used a Technique Junkies technique for the antiqued paper behind the teal strip. The gold bow was on my desk..... I added buttons and Baker Twine and a dab of Sakura Gelly roll pen on the butterflies to finish my card.
I was also inspired by a few more challenges:
365 Cards- Color challenge #192- (helped me pick out DSP)
Crafters 4 Eternity- colors
Frosted Designs- use a ticket on your project
Totally Papercrafts- cute plus buttons
Just for Fun- Vintage
Play Date Cafe- Color inspiration
Crafts and Me-Buttons and Bow
Flutter By Wednesdays- Butterfly
I also linked up to Artists in Blogland- as I am a visual person, I really love seeing what other masterpieces others create. Wonderful projects and I hope to get ideas for my (future) Art Journal!!!

Thanks for stopping by!
Shelly
I know you are looking at the picture wondering who's blog you are on....yep- it's me.....! I used a collage type layout and have to say I enjoyed it very much! The image, french page/text, ticket, background DSP and the shimmery paper behind Trisha's signature are all from Trisha. I cut her signature out from the letter she sent with the swap items. the butterflies and strip with KC on the bottom are cut off of her envelope.
I like to sew on cards- so added some stitching. I think this is my first 4" x 81/2 " card- I could be wrong...... I used a Technique Junkies technique for the antiqued paper behind the teal strip. The gold bow was on my desk..... I added buttons and Baker Twine and a dab of Sakura Gelly roll pen on the butterflies to finish my card.
I was also inspired by a few more challenges:
365 Cards- Color challenge #192- (helped me pick out DSP)
Crafters 4 Eternity- colors
Frosted Designs- use a ticket on your project
Totally Papercrafts- cute plus buttons
Just for Fun- Vintage
Play Date Cafe- Color inspiration
Crafts and Me-Buttons and Bow
Flutter By Wednesdays- Butterfly
I also linked up to Artists in Blogland- as I am a visual person, I really love seeing what other masterpieces others create. Wonderful projects and I hope to get ideas for my (future) Art Journal!!!

Thanks for stopping by!
Shelly
Labels:
Collage,
Technique Junkies
Thursday, September 8, 2011
McMahon Five Designs New Releases 9/8//11
This week, McMahon Five released another batch of great sweet images- you can see the new releases in my prior post. I saw this wonderful witch image and had to use it!
Challenges:
Midnight Madness #120-Sketch
365 Cards- So not Me- using flowers is so not me!!!
Crazy Amigo- Sewing
Craft Your Passion- Flowers
Floweret- Halloween
Thanks for stopping by!
Shelly
McMahon Five Designs New Releases 9/8//11
Here is what's new at McMahon Five Designs today:
Thanks for stopping by! Shelly
For more details on the projects above, visit the Design Team blogs!
Thanks for stopping by! Shelly
Subscribe to:
Posts (Atom)