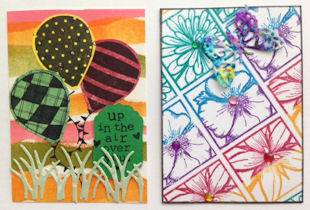
I got out a new (to me) crafting medium- Color Bursts from Ken Oliver Crafts, now available at SweetStamps.com. Color Bursts are pigments that are very fine and come in a 8g bottle. You lightly squeeze the bottle they are in, and mix the powdered pigment with liquid and the colors come alive. They are transparent and are NOT water resistant. (Eg, Think of what happens when you flick water droplets on Distress Inks- Color Bursts will react the same way). Have paper towels available to blot color if it is too wet and to avoid getting your colors muddied.... You will see that the colors do mix with one another where they overlap. (So, dry between colors if you do not want that look). If using just one of the colors, as the pigment spreads out on the cardstock, you may see other colors 'come out'. If you do not like colorful hands, consider wearing gloves, although the color does come off with a little work : )
I went to You Tube and found a number of ways to create with the pigments:
1) Place in a container and spritz some water in and use as a watercolor. A little goes a long way, so be conservative when you make up your first couple of batches. See the Julie Fei-Fan Balzar link for visuals on this method.
2) Use them as a wash- Sprinkle them on a watered surface and let them spread.
3) Spritz more water on #2 and let them run
4)Add to clear Gel Medium- this will make the color permanent (they remain translucent if you mix them with a translucent medium). (Julie Balthazar)
5)Place some Color Burst in a mister and add water- makes a spray.
6)Emboss your image for an emboss resist. You can apply Color Burst to cardstock first, then emboss as well for a colorful resist. (there will be color under the embossing, then add color on top of it).
7)Apply over a stencil and spritz with water. Use the top side on another sheet of cardstock. Or, flip the wet stencil over onto another piece of cardstock and start spritzing on the color. (Lindsay the Frugal Crafter). I tried this using a SweetCuts die using white glossy cardstock.
8)Apply to your craft mat, spritz and blot your paper in the wet pigment.
9)When good and wet, use your heat tool to 'blow' or move the color around.
10)Add flecks or droplets of color using a paintbrush/toothbrush.
11)Use baby wipe- apply color directly to it and use as a stamp pad, or use to swipe color directly to cardstock. For more faded colors, spritz the baby wipe with water first- it dilutes the color.
12)Use Color Burst on cardstock. Place color side against a stencil, spritz H2O on the back side and let dry. You will have ghosting on the color side of the cardstock once it dries. Do not set it on anything when drying that will affect the ghosting process. (Sparkle n Sprinkle).
13)Spray 5-6 spritz of Color Burst in a container of H2O, and place sheets of watercolor paper into it- ~ 1 hour- the color will 'wick' up onto the cardstock. You can turn over and do the other side s well (Sparkle and Sprinkle).
14)You can dye your Seam Binding/ribbon/lace with it.
15)Color your modeling paste. How dark/bright/colorful it is will depend on how much you use in proportion when mixing them. Use it anyway you would use modeling paste- my first thought is a stencil. If you add color with Color Burst over the colored modeling paste, the color you are painting with will wick into the modeling paste
16) Cut out a die using a piece of plain paper, place over the Color Burst cardstock and you will have a colorful opening where you cut out the die. OR, reverse that and cut the die out of the Color Burst cardstock and have the plain cardstock showing thru- the examples were white and black, any color would work.
17) Use Masking fluid on the cardstock- let dry, then apply the Color Burst ( eg a written word like LOVE). When you peel off the masking fluid ..... it will show off the resist area in the color of the base cardstock.
My first step with a new medium is to make color swatches
The top row is manilla folder cardstock, the middle row Georgia Pacific and the bottom row is Watercolor paper. The water sat on top of the manilla folders and did not dry as fast as the other two. I also made dyed ribbon for each color as well- placing the seam binding in a baggie, spritzing with
water then adding the color burst and mixed it all up from the outside- no getting dye all over my fingers : )
Here is a peak at #7 in my list- I used a Swetcute die cut from glossy cardstock instead of a stencil- I will be able to use the colored die cut in the future too : )
My tag was made using the 2nd tag one from the Lt........ I got some of the Color Burst on the mat, so I misted it and picked up the color off of the mat- #8 on the list above. The ribbon on my tag is from the Orange Color Burst.
I would love to hear any additional ways you can think of to use Color Burst- looks like I am going to be having a blast experimenting!
Here are a few of the links I watched:
Julie Fei-Fan Balzar: https://www.youtube.com/watch?v=PEWvH-jej00
Catherine Pooler; https://www.youtube.com/watch?v=GmgCleEXGmE
Sparkle N Sprinkle Demo Donna : https://www.youtube.com/watch?v=OAaPyVbyMhQ
Lindsay the Frugal Crafter: https://www.youtube.com/watch?v=DCIhTedWBK0
Challenges for my tag:
Simon Says Stamp- AG
Deep Ocean- Monochromatic
Word Art Wednesday- AG
Thanks for stopping by!
Shelly


