
It lays flat to fit into the envelope, but once opened, it opens up to reveal the fun images or sentiments you add to it!

I used 2 different Santa's on the card and a circle sentiment on the base in all 4 corners. This is akvsantahohoho.

On the base in all 4 corners, I added Chimney Circle, in keeping with the Santa theme. .
OK- for the 'HOW TO' :
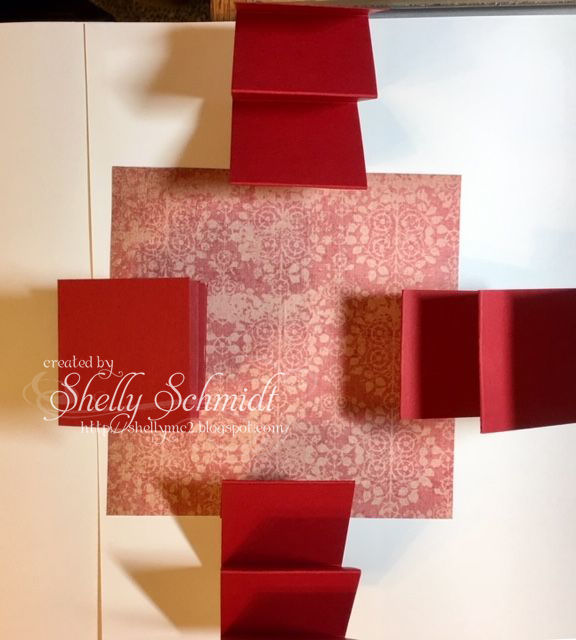
For the base of the card, use the 6" square DP with a design. I glue the rest of the base together as the last step. (So it does not get dirty : ) If you are using thin DP consider adding a piece of cardstock for stability.
The first step is to glue the accordion folded strips to the base. Glue the last 2" square at the end of each strip to the (bottom) of the above 6" square.
I penciled in an + in the center of the back of DP on my piece to center the accordion strips- see photo.
*Each strip is 2" wide, so this guides you for centering. The strip will be glued in the middle third of the 6" square of DP-

After I glue on the accordion strips, I am going to skip to another step- the top 'pull' area. If you look at online tutorials, they do this later, but it makes more sense to me to do this now.
Glue the 7/8" x 3/34" strips as shown in the picture.

This is the top of the + with DP showing.


This is the + from the underside.
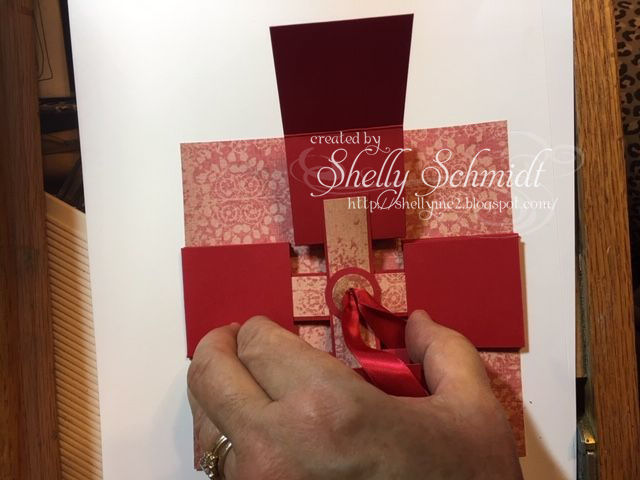
Next, add the circles- these are stabilizers for holding the ribbon.
The circles that are 1" and 3/4" belong on the top, There are 2 1" circles that go on the underside- one has a hole punched it it, the other does not - they go on the underside, the one with no hole will cover up the ends of the ribbon.
Next, attach the ribbon.

Fold the ribbon in half and push it through the (punched) hole from the bottom to the top. Next, hot glue the ends of the ribbons to the bottom as shown in the picture. First, make sure your ribbon is not twirled on the top side....... : )
Next, add the last red circle (no hole punched in it) with hot glue to cover up the ribbon ends.
OK, next we are going to glue this piece to the accordion strips.

Once it is centered to your liking, just glue the end of the top strip to the underside of the top 2" x 2" piece. (I write this because I put glue on the bottom side and it stuck to the next accordion section....LOL). SO, in the top piece we made, we put glue just on the top edge of the 2" square,

This is what your card should look like at this point- all ready to decorate!

Glue the base pieces on- the 6.25" x 6.26" red base, and the 5.75" x 5.75" white piece that is on the base- you will write your note here, I wait until my card is completed to add the white piece so I do not get it dirty : )


The HoHoHo in Silver Mirror cardstock (Sweet Stamps) was cut out using Alphabet Dies from Crafty Ann.
The akvSantas were cut out using a Die-Versions stitched die set.

This is where I write my note- it is on the underside of the card- see why I wait until last to write a note?


The HoHoHo in Silver Mirror cardstock (Sweet Stamps) was cut out using Alphabet Dies from Crafty Ann.
The akvSantas were cut out using a Die-Versions stitched die set.

This is where I write my note- it is on the underside of the card- see why I wait until last to write a note?
What a fun Holiday card, don't you think? It goes pretty quickly too.
Here is a list of the items I used in making the card:
1 piece 6"x6" DP (Vintage design- by K and Company)
4 strips main color cardstock cut to 2" x 12" ; score
@ 2", 4", 6", 8", 10"
2- strips 7/8" x 3.25"
4 circles punched out (3 are 1" and 1 is 3/4")
5/8" Ribbon 12" long
1 piece red 6.25" x 6.25" square cardstock
1 piece coordinating 6"x6" DP
1 piece white 5.75" x 5.75"
Squares of white or coordinating DP 1.75" x 1.75"
4 dies or other embellishments for top tier of accordion
4 stamped or printed images for base card corners
5/8" Ribbon
Washi tape
Happy Creating!
Shelly
8 comments:
Wow.. that's fantastic Shelly! My gosh!
Hugs, Susi
I have seen these done and been wanting to give it a try!! So love how yours turned out here! Such a cute design and I bet it's really fun to play with too!! :) Thanks for sharing your wonderful tutorial!! HUGS
What a great effect, and actually quite simple once you get your head around the construction!
Blessings
Maxine
How intricate. Great tutorial. It's nice to see different styles of cards. Beautiful work.
WOW! Thanks for the tutorial Shelly... this is awesome!
Shelly, this is amazing! And oh so cute! Love your Santa theme. Bugaboo has lots of fun Santas. If I can find the time I just may have to give this a try. I love new fun folds. Hope you are doing well. Big hugs!
How fun is that!! Sensational photos and tutorial, Shelly, for this fabulous design!!
Lovely Shelly! I will surely visit this post again.
Post a Comment